Moving past the improvement plateau, Part 2
Posted 30 August 2009 to Tactics, The Game by Jeff Soo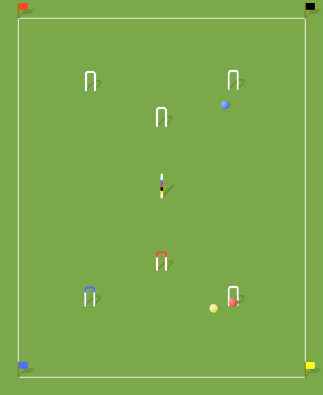
Part 1 ended with a quiz, repeated here: in Diagram 1, your opponent was making a four-ball break with red, and has failed at 3-back. Black was nearby and you have just roqueted yellow and are ball in hand on it. Red is three-ball dead and is dead center in the jaws of 3-back, so that you can easily rush it either way. All other other balls are clean and for #2. What are you going to do, and why?
Tactics depend on ability level, so that usually a question such as this will have more than one reasonable answer. But this question provides very suggestive clues about the ability of the opponent. With three balls clean and for #2, clearly there hasn’t been a great deal of interactive play yet. That the opponent has already managed a four-ball break to 3-back shows that this is quite a capable player. And no matter what your ability level, if you are playing an opponent this good, you are going to have to get the most out of your scoring opportunities if you want to win.
Again, from Part 1, the first question you ask in any situation is: is there a reasonable opportunity for an immediate four-ball break? Yes: rush red to blue, then rush blue to #2. It’s not trivial, because two fairly accurate rushes are required. But remember the ability level of the opponent. No matter your own ability level, your best chance of beating an opponent this strong is to take full advantage of every scoring opportunity, and a four-ball break is the ultimate scoring play. Free four-ball breaks, such as this one, are rare, and you are unlikely to get another opportunity this good. So take the break.
For some of you this answer will have seemed so obvious that no explanation is necessary. But a typically defensive American-rules player will be very reluctant to take any line of play that does not leave red three-ball dead. This reflex can be so strong that many players would immediately rush red back out of the hoop without thinking any farther ahead. Indeed, that’s what actually happened in the game where I saw this situation arise.
There are some alternative plays that appear to have the attractive quality of letting you have it both ways—keep red dead and still have a chance at the four-ball break this turn, or at least a three-ball break for blue’s next turn. I say “appear to have”, because any such play is going to be inferior to simply rushing red to blue and going all-out for the immediate four-ball break. There are many reasons; I will spare you a complete proof. If you are in doubt I encourage you to try it out on the lawn. Keep this in mind: your goal in any of these plays is to get a three- or four-ball break either with black or blue. You are expecting to clear red anyway, by scoring 1-back, so the only thing you gain by not peeling it now is a one-point advantage. Also, any play that reduces the chance of the immediate four-ball break correspondingly increases the chance that yellow will hit in next turn for a four-ball break of its own.
If you were thinking about a purely defensive line of play, planning to keep red dead while you creep round to 1-back with both your balls, remember that yellow is completely clear. You may not get far before the opponent turns the tables on you.
Yet another advantage of the immediate four-ball break is that it gives you the best possible chance not only of scoring lots of points with black, but also ending your turn clear and with blue set for a three-ball break. It’s hard to overstate the value of this: an immediate four-ball break is worth much more than a prospective three-ball break for the next turn.
In Part 1 I posited three classes of tactical errors. The first two were putting defense ahead of offense, and failing to see three- and four-ball break opportunities. In the example we’ve been looking at, many players will fall prey to one or both of these errors.

The third type of error is poor break management. Here’s an example that presents all three pitfalls: The opponent has just failed #3 with red, and yellow is about three yards south of the hoop. Both black and blue are on the west boundary. The only deadness is red on yellow. You are for #2 with both balls, and yellow is for #3. What will you do, and why?
Last modified on 4 March 2017