The Attacking Bisque, part 2
Posted 4 December 2007 to Handicap Play, Tactics by Jeff Sooby Jeff Soo
In The Attacking Bisque, we looked at simple examples of proactive bisque use—using bisques to create a break. Now we’ll look at some more challenging cases.
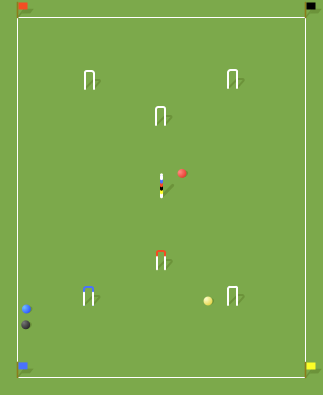
Diagram 2
First, though, the answer to the question posed at the end of The Attacking Bisque. In Diagram 2 (shown again here), it is black to play. You have bisques and are for 4, but you are dead on yellow. What is missing to convert this into a four-ball break? You have a pivot ball and a ball at your wicket, although you are dead on it. So you need a pioneer—a ball at 5—and a way to score 4 without using yellow.
Cut rush blue up the lawn, to somewhere several yards south of 2. The exact position is not important. With a split shot send blue to 5 while black goes to red. Roquet red and take off to 4. If you get good position at 4, run the wicket and you have your break without using any bisques. Otherwise, take position and then use a bisque to carry on.
So far the examples have all had both opponent balls well away from the boundary. When the opponent gives you such a gift you should certainly look to set up a four-ball break, because it will often be possible to do so with just one or two bisques. But most opponents are not in the habit of leaving both balls out on the lawn. Unless you can also deal with balls on the boundary your break-making opportunities will be limited.
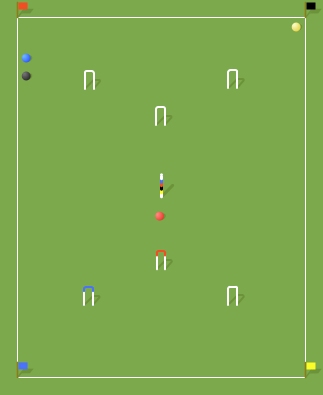
Diagram 3
In Diagram 3 you are playing blue, are alive on all balls, and are for 3. And of course you have some bisques. It takes good play to work a corner ball into a break, but the best opportunity is when you are for the wicket nearest that corner, as in this example. What’s a good plan for laying out a four-ball break, using just one or two bisques? There are many such sequences, but the key is to find one well within your ability, in which every shot has a high probability of success. Most higher-handicap players should not depend on getting accurate rushes, for example.
A very direct plan is to tap black, then roll both balls over to 3. Play the continuation shot to get close to yellow, then take a bisque and roquet yellow. Send yellow down to 4 while blue approaches 3. If you happen to get good position you may save a bisque; otherwise take position and then use your second bisque to score 3.
While simple, this sequence does include two fairly difficult shots—the intial roll shot and the long-ish approach to yellow in the corner. An extra step allows you to avoid those shots. Rush black south and into the court. The exact location isn’t critical, but you would like to get within ten yards of red, closer if possible. Croquet black to 4 with blue approaching red. Roquet red and take off toward yellow. Don’t risk going out of bounds, though—play for about halfway between yellow and the wicket. Then use the continuation shot to get close to yellow, and take a bisque to roquet it. Now roll both balls out to the wicket. If you play this conservatively there is an excellent chance you will get your four-ball break for two bisques, and a reasonable chance it will only cost you one bisque.
For a variation, if you happen to get a good rush on red toward 3, rush to the non-playing side of the wicket. Then you have a shorter take-off into the corner. Send yellow to the middle as a pivot while blue approaches the wicket.
If you do get this rush on red, you might be tempted to ignore yellow and try for a three-ball break instead. You might save a bisque or two this way, but you would be missing an opportunity to use those bisques to get a four-ball break. Such opportunities are too rare to pass up. It’s well worth the initial investment of bisques to pick up yellow—especially as yellow is the spent ball.

Diagram 4
In Diagram 4, the situation is the same as above, except that now blue has a dolly rush to 3. How would you proceed? It is tempting to rush black to 3 and then try to score it directly, then see what happens afterward. After all, this would give you a good chance of scoring a point without using any bisques.
By now I hope you see that this would be shortsighted. There is an easy play here to set up a four-ball break by using bisques. But to get this play you must resist the temptation to take the “free” point. Rush black to 3, but aim for the non-playing side of the wicket. Take off to yellow. If you are good at touch shots you can try to get within two or three feet of yellow, but keep in mind the advice in A Bisque In Time. Using a bisque or not, as the case may be, roquet yellow and then send it to 4 while blue approaches the wicket. Once you get good position at the wicket you have your four-ball break, at the low price of two bisques. If the split shot with yellow goes especially well you will save one of those bisques.
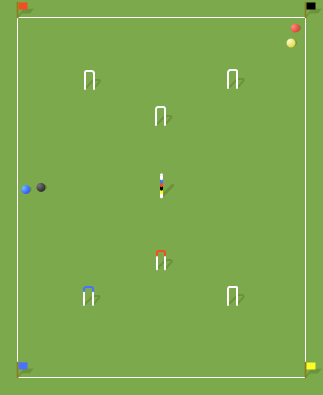
Diagram 5
Here’s one for you to plan on your own. Once again, blue is to play, has bisques, is alive on everything, and is for 3. Red is in the corner and yellow is a couple of feet away so that red has a straight rush to 4. There are several reasonable answers, but again the key is to find a sequence that does not include any difficult shots.
To see all articles in this series, browse the Reference: Handicap Play topic
Last modified on 3 March 2017